Searching for lip flip before and after photos is one of the smartest things you can do before booking an appointment. Photos don’t lie the way a sales pitch can — they show you exactly how much a lip flip changes (and doesn’t change) the shape of a mouth. In this guide, you’ll see what real results look like at each healing stage, understand why some photos look dramatic while others show barely-there changes, and learn how to judge a good result from a bad one. We’ll also cover cost, timeline, aftercare, and the questions people ask most before their first appointment.
Table of Contents
Quick Answer: What Does a Lip Flip Look Like Before and After?
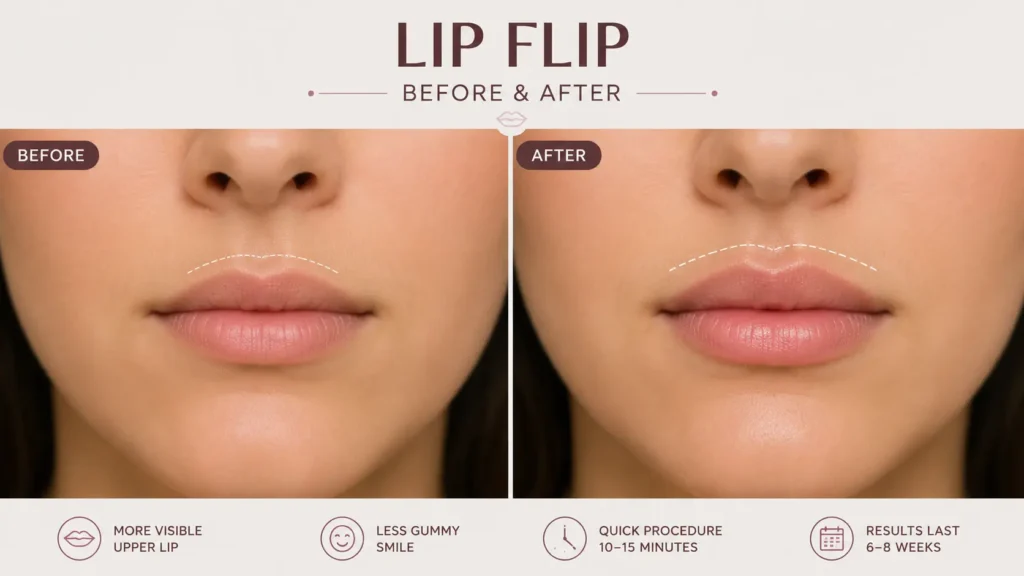
A lip flip uses a small amount of Botox (or a similar neuromodulator) injected into the upper lip’s border muscle. In before and after pictures, the “before” lip often looks thin or curls slightly inward when smiling, while the “after” lip appears fuller and rolls outward, giving a subtle, natural-looking pout without added volume.
Key Takeaways
- A lip flip relaxes the orbicularis oris muscle so the upper lip rolls slightly outward and appears fuller.
- Unlike lip filler, no volume is added — the change comes entirely from muscle relaxation.
- Visible results typically appear within 3 to 7 days and peak around day 10 to 14.
- Results usually last 2 to 4 months, shorter than most filler treatments.
- Good before and after photos should be taken from the same angle, lighting, and facial expression to be a fair comparison.
- The best candidates have a thin upper lip or a lip that disappears when smiling, not lips that need more overall volume.
What Is a Lip Flip? A Quick Refresher
A lip flip is a non-surgical treatment where a small dose of Botox, Dysport, or another neuromodulator is injected into the muscle that circles the mouth, called the orbicularis oris. Relaxing this muscle allows the upper lip to roll or “flip” outward, exposing a bit more of the pink part of the lip (the vermilion). This creates the appearance of a fuller pout without adding any filler volume.
This matters because it’s often confused with lip filler, and the two produce very different results in before and after photos.
Lip Flip vs. Lip Filler: What the Photos Actually Show
This is the single biggest source of confusion when people browse lip flip before and after photos, and it’s a gap most competitor galleries never explain.
| Feature | Lip Flip | Lip Filler |
| What’s injected | Botox or similar neuromodulator | Hyaluronic acid gel |
| How it works | Relaxes the lip muscle | Adds physical volume |
| Visible change | Upper lip rolls outward, subtle fullness | Noticeably plumper, more defined lips |
| Best for | Thin upper lip, “lip that disappears” when smiling | Overall lip size and shape changes |
| Onset | 3–7 days | Immediate, with some initial swelling |
| Duration | 2–4 months | 6–18 months, depending on the product |
| Downtime | Minimal | Minimal, more swelling/bruising common |
| Average cost | $100–$350 | $500–$1,200+ per syringe |
If you’re comparing lip flip before and after photos to filler before and after photos, expect the lip flip results to look subtler. That’s normal, not a sign of a weak treatment.
Lip Flip Before and After: What Changes at Each Stage
Understanding the healing timeline helps you judge whether a set of before and after photos is showing a “final result” or a still-swollen “too early” result — something most competitor pages skip entirely.
Day 0 (Immediately After Treatment)
The lip typically looks the same as before, sometimes with tiny injection-site bumps that settle within an hour. This is not the stage shown in most “after” photos, though some clinics mistakenly post it.
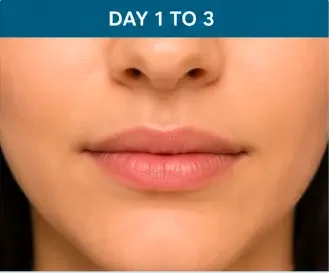
Day 1 to 3
Minor swelling or a slightly uneven smile can appear as the Botox begins taking effect. Photos from this window can be misleading because the muscle hasn’t fully relaxed yet.
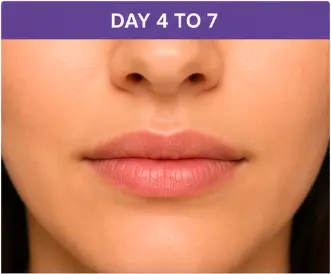
Day 4 to 7
This is when most people start noticing their upper lip rolling outward slightly, especially when smiling or talking. Many accurate “after” photos are taken here.
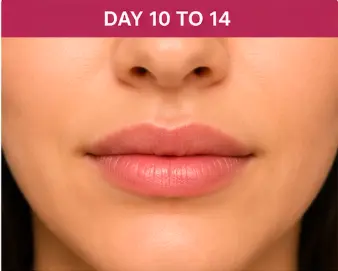
Day 10 to 14
Full results are visible. This is the ideal time for a true “after” photo, and it’s what a trustworthy gallery should be using for comparison.
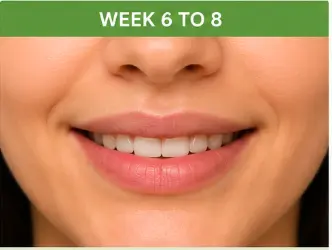
Week 6 to 8
Results are typically stable and looking natural, having settled fully into the muscle.
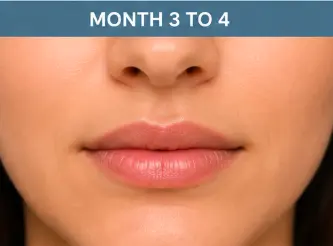
Month 3 to 4
The effect gradually fades as the muscle regains normal movement, and the upper lip slowly returns to its original resting shape.
How to Read Lip Flip Before and After Photos Correctly
Not all before and after galleries are equally trustworthy. Here’s what to check before you trust what you’re seeing:
- Same angle: Front-facing “before” and “after” pictures should be taken from the same distance and angle.
- Same expression: A relaxed “before” photo compared to a big smiling “after” photo will exaggerate the difference unfairly.
- Same lighting: Harsh overhead light can make lips look thinner; soft, even light can make them look fuller.
- Timestamp or healing stage noted: Reputable providers state whether the “after” photo was taken at day 1, day 7, or day 14.
- No filter or makeup changes: Lip liner or gloss added only in the “after” shot skews the comparison.
- Multiple angles: Front view, profile view, and a smiling view together give the fairest picture of results.
What a Realistic Lip Flip Result Looks Like
Across real patient galleries, a well-done lip flip tends to share these visual traits:
- The upper lip appears slightly fuller, mainly in the center (Cupid’s bow area).
- The lip no longer disappears or thins out when smiling.
- The change is proportionate — the lip doesn’t look “added onto,” just repositioned.
- Lip texture and natural lines remain visible, just softened.
- Movement while talking and smiling looks natural, not frozen.
Signs of an Overdone or Poorly Executed Lip Flip
Photos showing these traits are examples to avoid replicating, and useful for understanding what “too much” looks like:
- A stiff, duck-like pout with a flattened Cupid’s bow
- Difficulty pursing the lips, drinking from a straw, or pronouncing certain sounds
- Visible asymmetry between the left and right side of the lip
- An upper lip that looks disproportionately large compared to the lower lip
If a before and after gallery only shows extreme, dramatic transformations, that’s often a sign of overfilling the technique rather than a realistic outcome.
Who Is a Good Candidate? (And Who Isn’t)
Good candidates typically have:
- A thin upper lip relative to the lower lip
- A “gummy smile” where the upper lip disappears while smiling
- A desire for subtle enhancement without added volume
- Realistic expectations about how minor the change is compared to filler
A lip flip may not be the right fit if you:
- Want significantly bigger, more defined lips (filler is usually more appropriate)
- Have naturally full lips already
- Play a wind instrument or do activities requiring precise lip control, since temporary weakness can affect performance
- Are pregnant or breastfeeding, since neuromodulators are generally not recommended during this time
A licensed injector, ideally a physician, nurse injector, or physician assistant with aesthetic training, should assess your anatomy before treatment. This article is for general information and isn’t a substitute for a professional consultation.
Step-by-Step: What Happens During a Lip Flip Appointment
- Consultation: The injector examines your lip shape, smile pattern, and discusses your goals.
- Cleansing: The treatment area is cleaned to reduce infection risk.
- Marking: Injection points are marked, usually 4 to 6 spots along the upper lip border.
- Injection: A very fine needle delivers small units of neurotoxin into the muscle. This typically takes 5 to 10 minutes.
- Aftercare instructions: You’re advised on what to avoid for the next 24 to 48 hours.
- Follow-up: Many providers recommend a check-in around 2 weeks to assess results and correct any asymmetry if needed.
Lip Flip Aftercare Tips for the Best Results
- Avoid lying flat or rubbing your face for 4 to 6 hours after treatment.
- Skip strenuous exercise for the rest of the day.
- Avoid alcohol for 24 hours to reduce bruising risk.
- Don’t apply excessive pressure to the lips (avoid straws or aggressive lip products) for a day or two.
- Give the treatment the full 10 to 14 days before judging the final result.
Common Mistakes People Make Before Getting a Lip Flip
- Expecting filler-level volume. A lip flip repositions, it doesn’t add bulk.
- Comparing “day 1” photos to someone else’s “day 14” photos. This creates unrealistic expectations.
- Choosing a provider based on price alone. Precise placement matters more than saving $50.
- Skipping the consultation. Not every thin lip benefits from a flip; some benefit more from filler or a combination approach.
- Ignoring lip anatomy differences. What looks amazing on one face may not translate to another.
Lip Flip Cost Overview
| Factor | Typical Range |
| Average price per treatment | $100–$350 |
| Units typically used | 4–6 units of Botox (or equivalent) |
| Duration of results | 2–4 months |
| Estimated cost per month of results | Roughly $30–$90 |
Pricing varies by provider experience, geographic location, and the specific neuromodulator brand used, so treat this as a general guide rather than a quote.
Lip Flip vs. Doing Nothing: Is It Worth It?
Pros:
- Subtle, natural-looking enhancement
- No added lip volume or “overfilled” look
- Quick appointment with virtually no downtime
- Fully reversible since effects wear off naturally
Cons:
- Results are temporary, needing repeat treatment
- Change is subtle and may be less noticeable to others than to yourself
- Possible temporary difficulty with certain lip movements
- Not a solution for lip asymmetry caused by structural (not muscular) factors
Frequently Asked Questions
How long after a lip flip will I see the full before and after difference? Most people see initial changes within 3 to 7 days, with the full, final result visible by day 10 to 14. Judging results before this window can be misleading.
Do lip flip before and after photos look different for everyone? Yes. Lip shape, muscle strength, and how much neuromodulator is used all affect the outcome, so results vary meaningfully from person to person.
Can I combine a lip flip with lip filler? Yes, some providers combine both for patients who want subtle muscle relaxation along with added volume. Combining treatments should always be discussed during a consultation.
Will a lip flip make my smile look frozen? When dosed correctly, a lip flip shouldn’t affect your smile’s natural movement. Overdosing is the main cause of a stiff or unnatural-looking smile.
How many units of Botox are used in a lip flip? Most lip flips use around 4 to 6 units, considerably less than treatments like forehead or frown line injections.
Is a lip flip painful? Discomfort is generally minimal and brief. Many providers apply a topical numbing cream beforehand to improve comfort.
Can a lip flip fix a gummy smile? It can help reduce the appearance of a gummy smile by relaxing the muscle that pulls the lip upward, though results vary based on the underlying cause.
Why do some before and after photos look more dramatic than others? Differences in lighting, angle, expression, and the healing stage at which the photo was taken can all make results appear more or less dramatic than they truly are.
How soon can I repeat a lip flip once results fade? Most people can safely repeat treatment once effects wear off, typically every 2 to 4 months, though timing should be confirmed with your provider.
Does a lip flip work for everyone? No. People with naturally full lips or those seeking significant volume increases usually see minimal visible change and may be better suited to filler.
Are there risks I should know about before comparing photos? Temporary side effects can include mild bruising, swelling, or short-term difficulty with certain lip movements. Serious complications are rare when performed by a qualified injector.
Can I wear lipstick or lip gloss right after treatment? Most providers recommend waiting a few hours to reduce pressure and contamination risk at the injection sites.
How can I tell if a photo gallery is showing real, unedited results? Look for consistent lighting and angles, visible healing-stage labels, and photos that show natural lip texture rather than an unusually smooth or filtered appearance.
Summary: What to Take Away From Lip Flip Before and After Photos
Lip flip before and after photos are most useful when you understand the healing timeline, know the difference between a flip and filler, and can recognize a well-executed versus overdone result. The best outcomes look subtle and natural, not dramatically different, and comparing images taken at day 10 to 14, under matching lighting and angles, is the fairest way to judge a provider’s real skill.
Before booking, review multiple sets of photos, ask your provider what stage each “after” image represents, and set expectations around the muscle-relaxing nature of this treatment rather than expecting filler-level volume. If you’re unsure whether a lip flip or a different lip treatment fits your goals, a consultation with a qualified, licensed injector is the best next step.